Unified HMI
Introduction
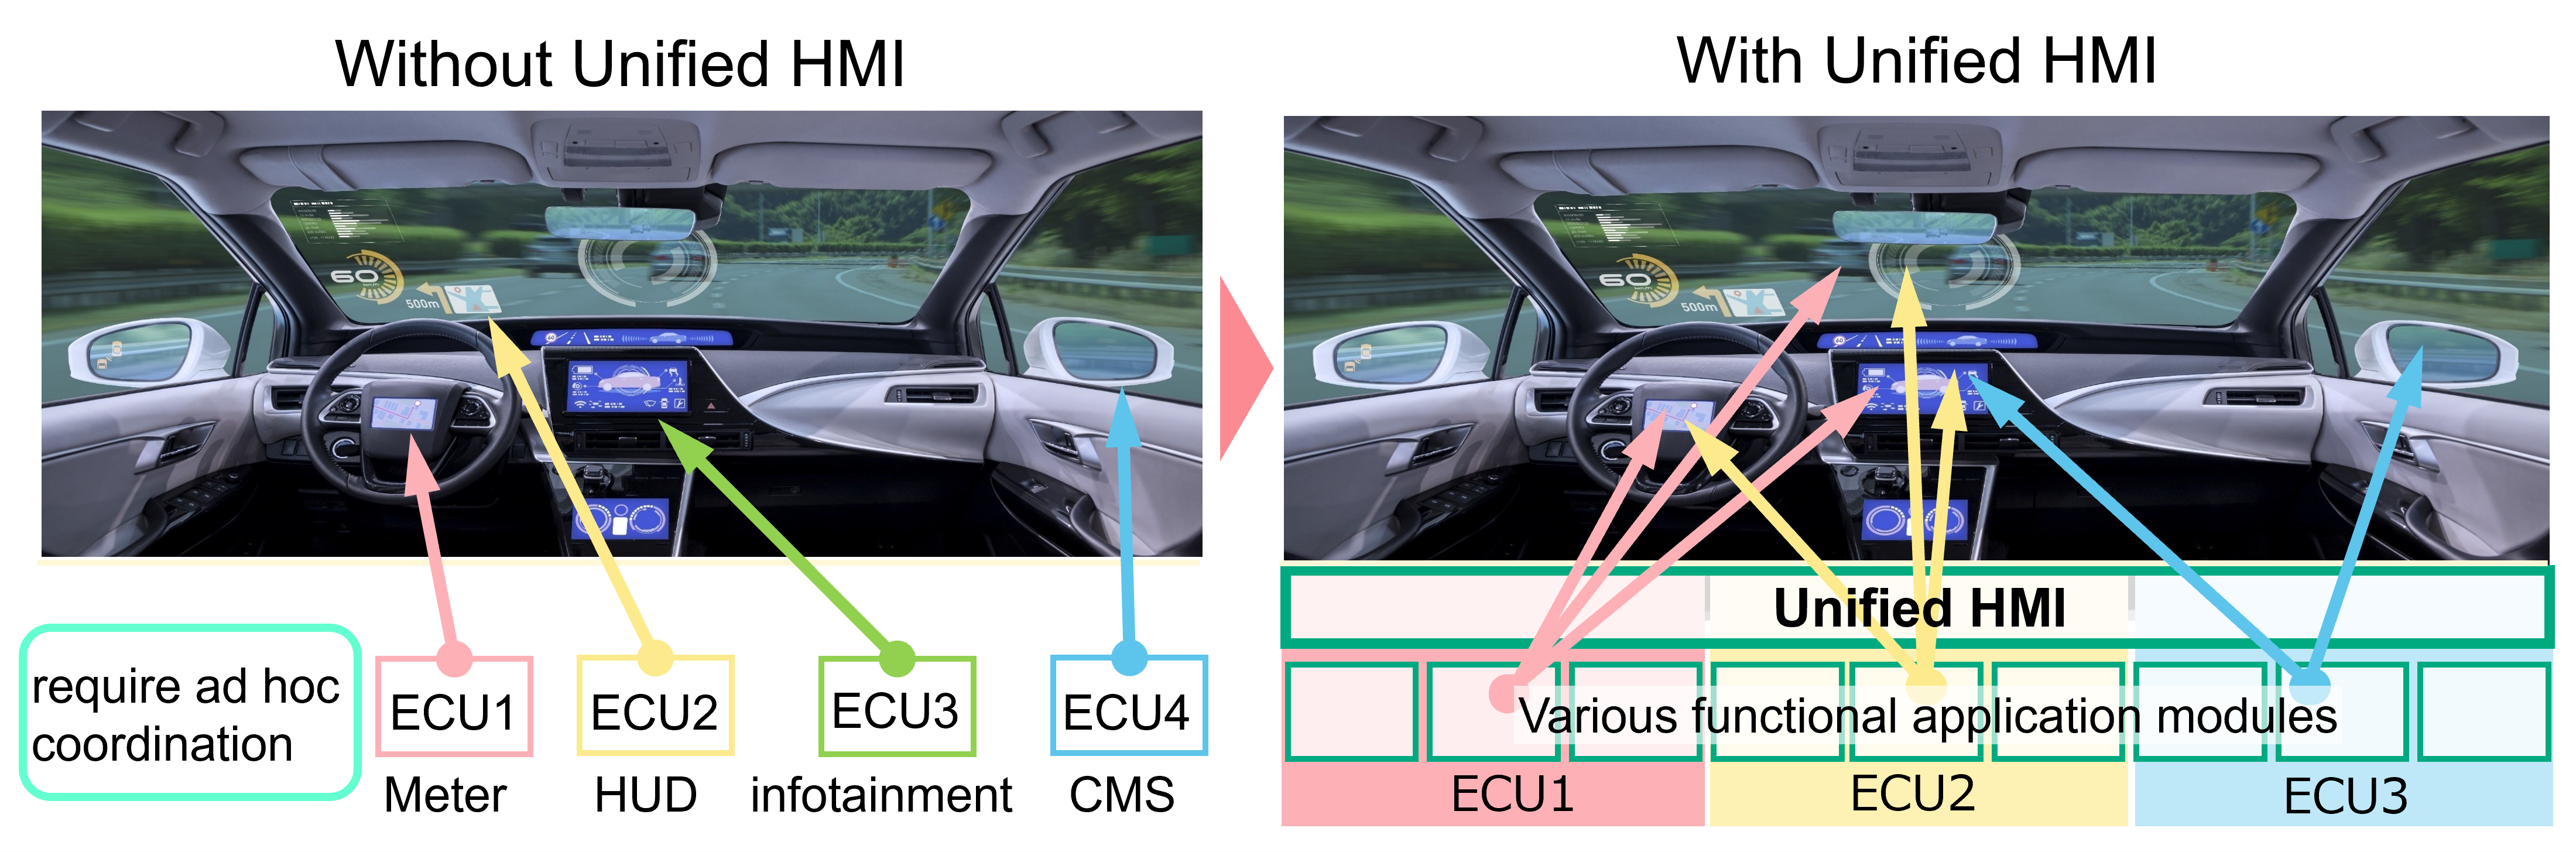
This document describes the design and usage of the Unified HMI, which is a Software-Defined display virtualization platform based on VirtIO GPU technology. Unified HMI allows for flexible development of the entire cockpit and cabin UI/UX, across multiple displays, independent of hardware and OS configurations.
Unified HMI frameworks
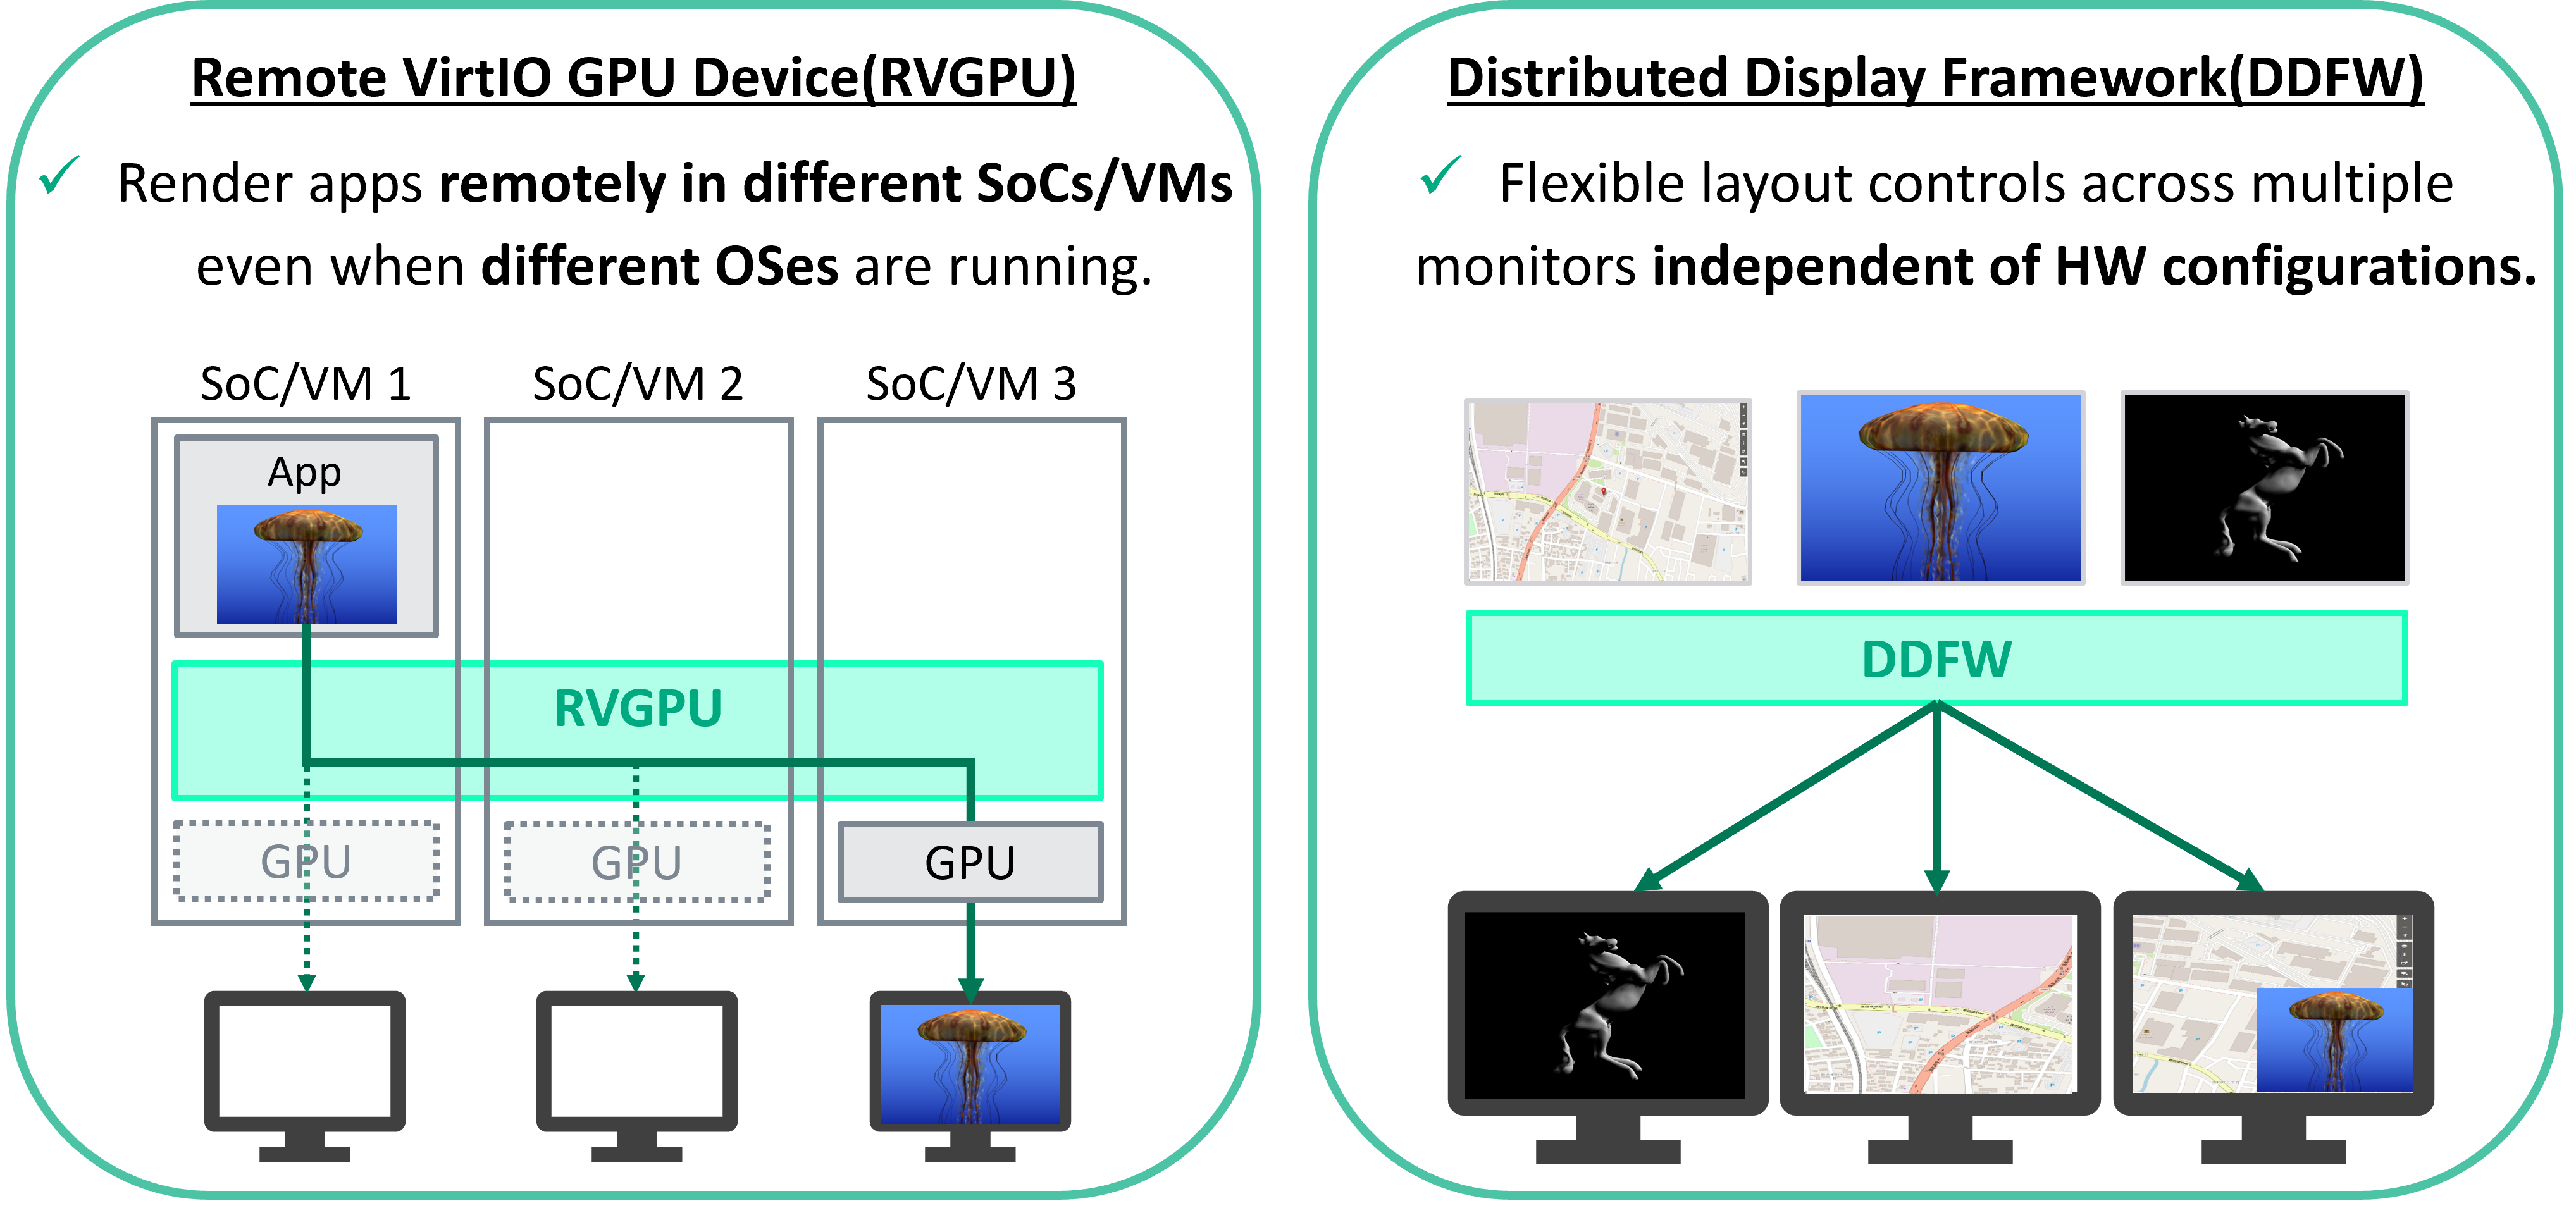
Unified HMI consists of two main components:
From here, easily explain about both RVGPU and DDFW. If you want to learn more about each component and how to use them, please refer to the adapted URL.
Remote Virtio GPU (RVGPU)
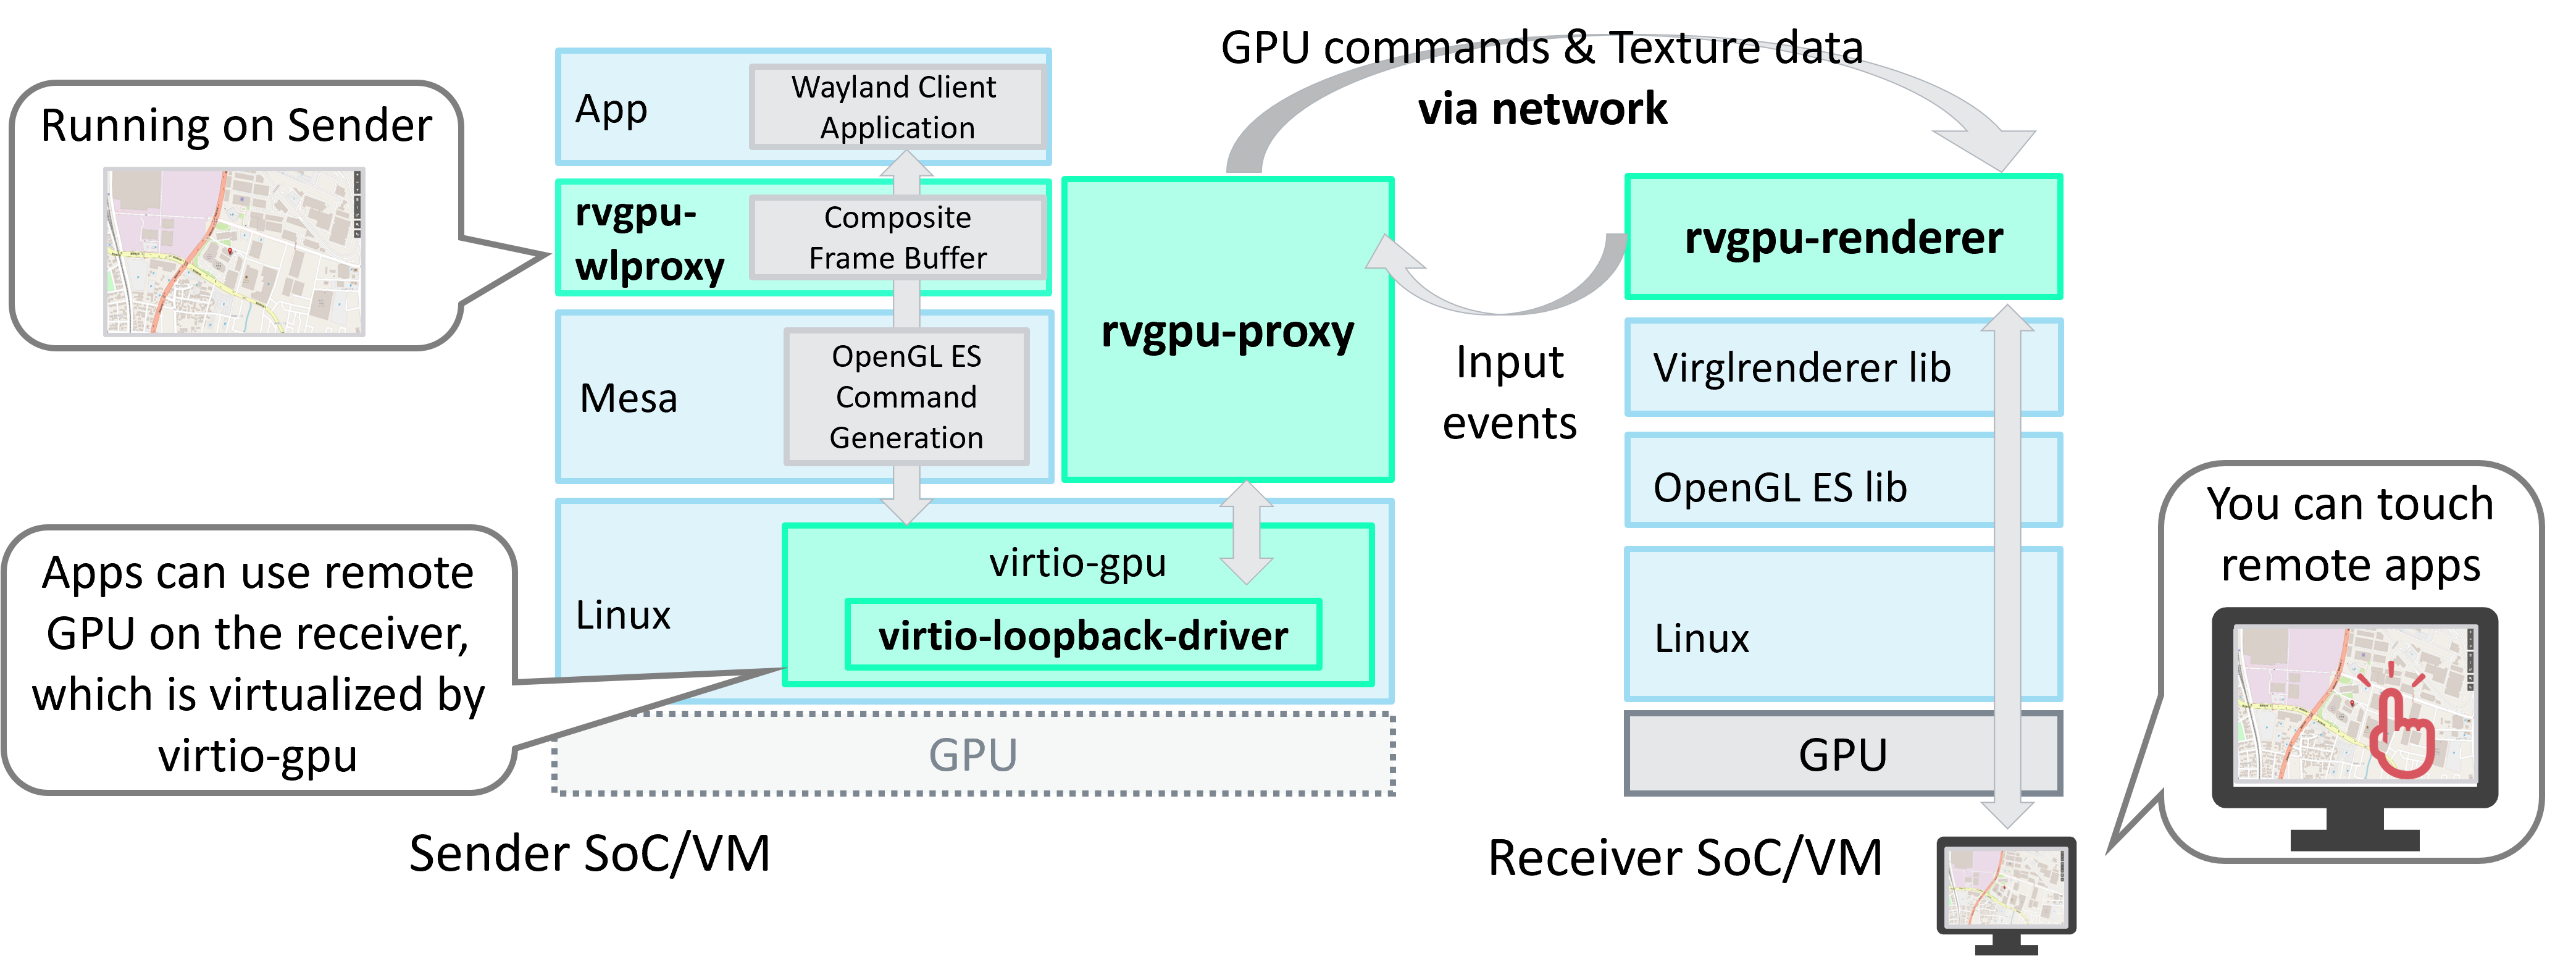
RVGPU is a client-server based rendering engine, which allows to render 3D on one device (client) and display it via network on another device (server)
RVGPU consists of three repositories on Github:
- remote-virtio-gpu: Main framework of RVGPU, including rvgpu-proxy and rvgpu-renderer. Transfer the drawing commands to the remote Soc/VM and render them on the remote display.
- virio-loopback-driver: Capture the drawing commands for VirtIO GPU and transfer them to the RVGPU framework.
- rvgpu-wlproxy: Apply applications that operate on the Wayland Protocol, including Flutter apps, to RVGPU.
Distributed Display Framework (DDFW)
DDFW provides essential services for managing distributed display applications. This framework is designed to work with a variety of hardware and software configurations, making it a versatile choice for developers looking to create scalable and robust display solutions.
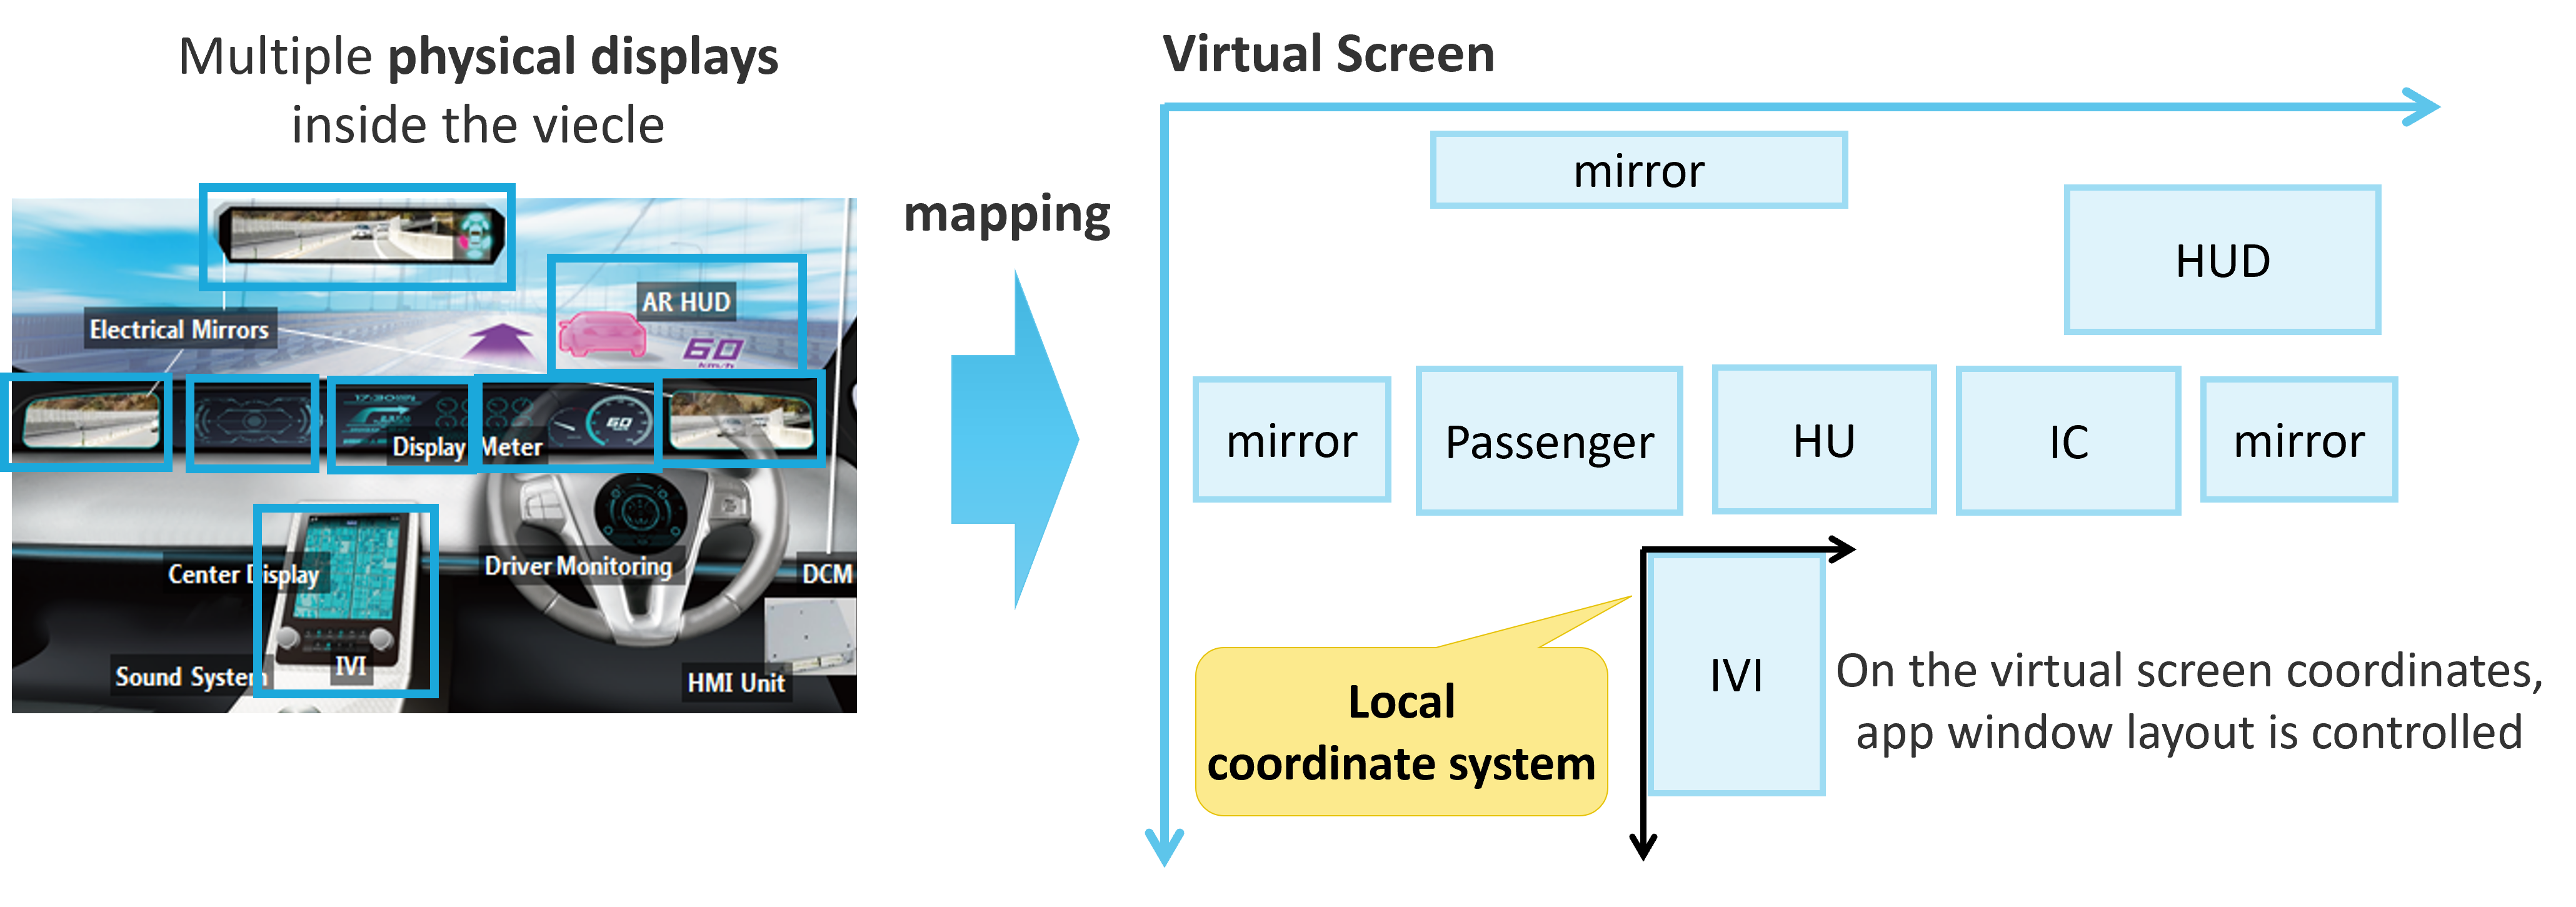
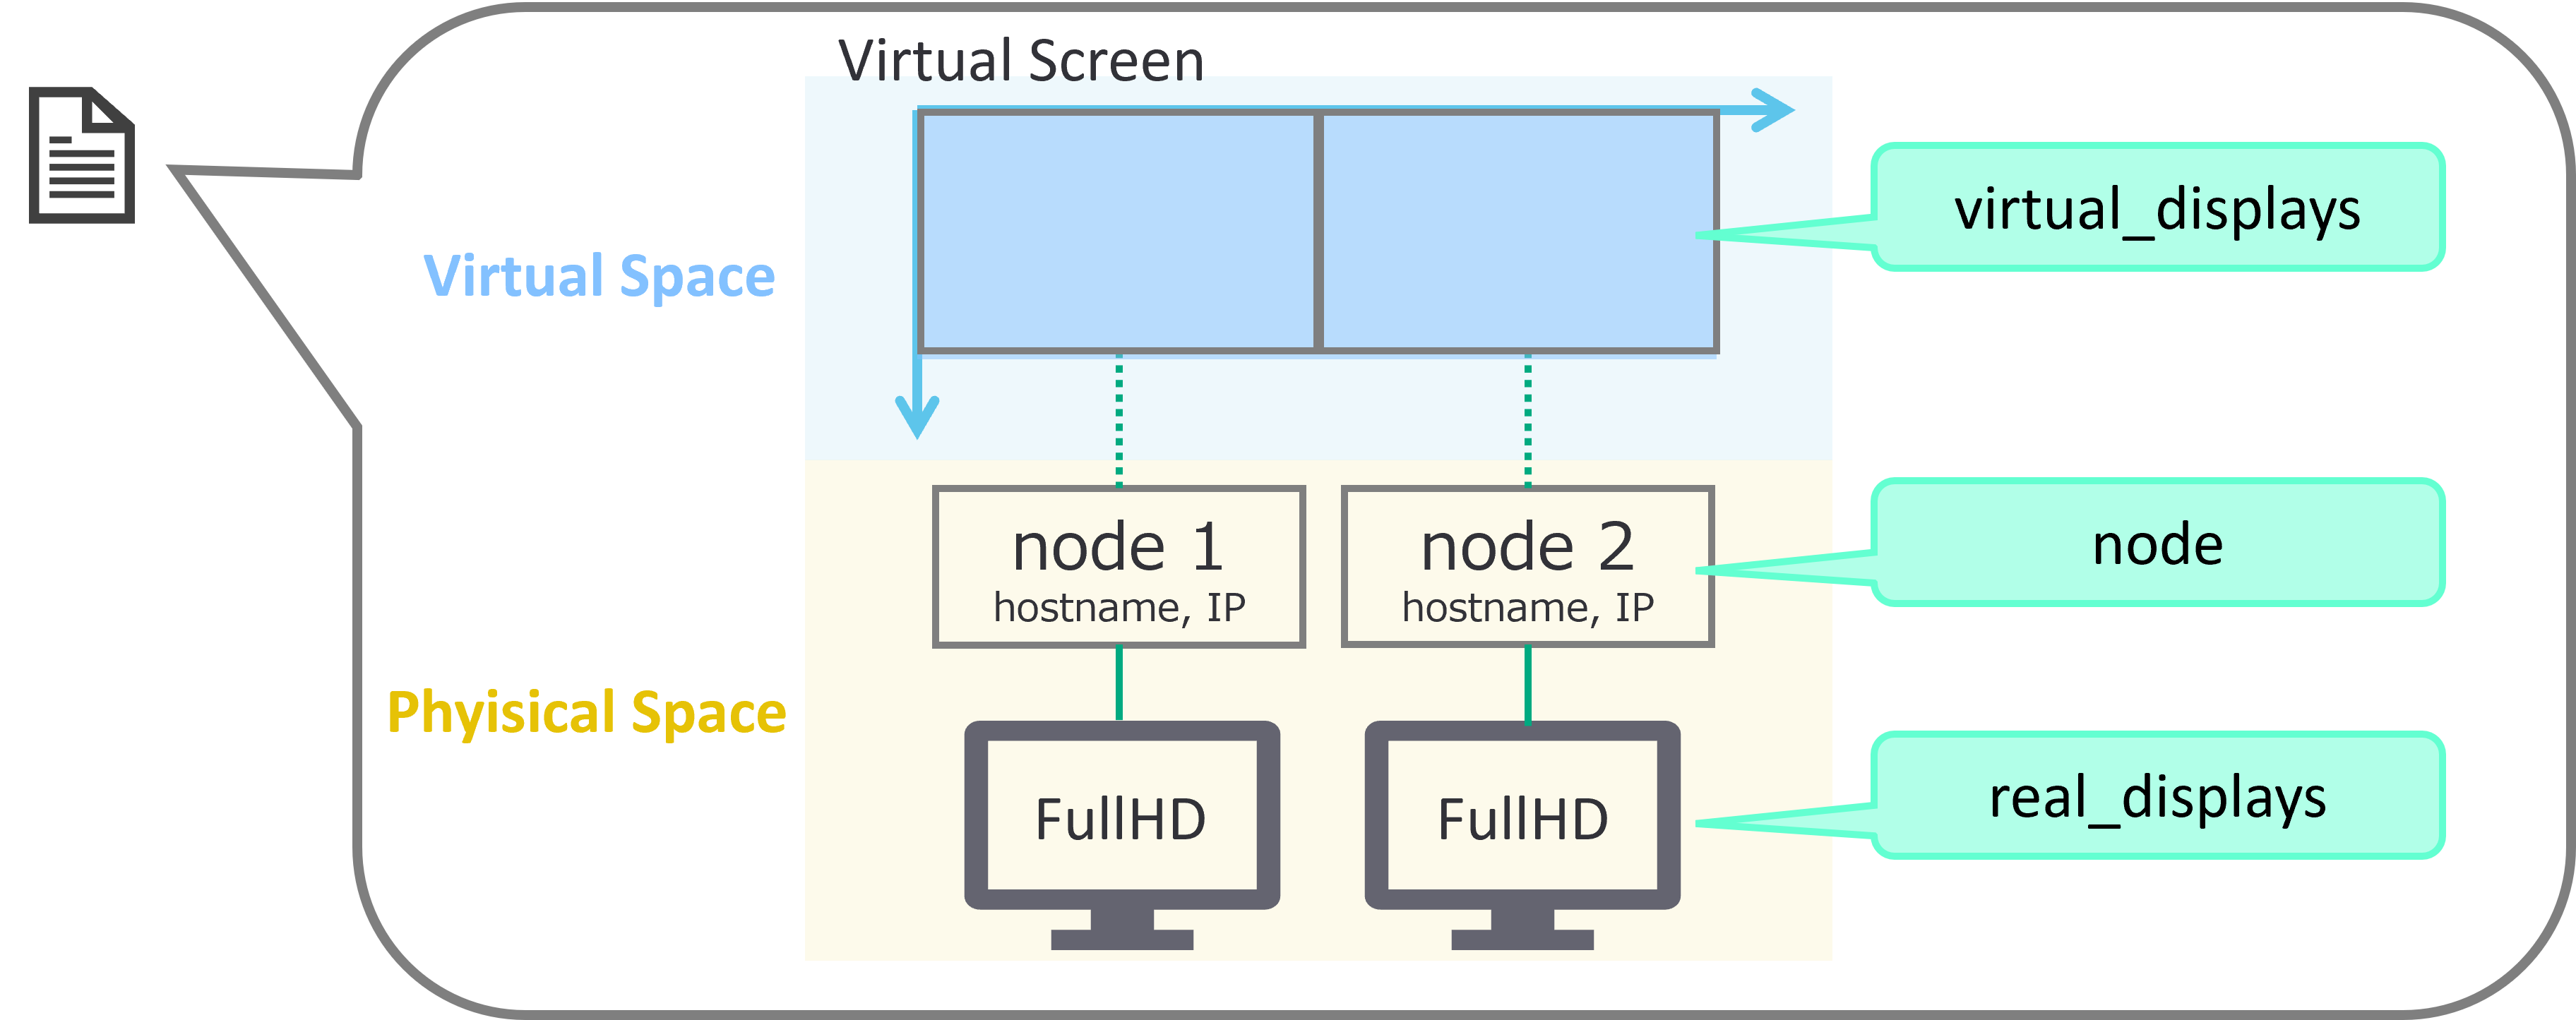
As shown in the figure below, DDFW maps multiple cockpit physical displays, into a single large virtual screen. By placing applications on the virtual screen, you can control their layout across multiple displays.
DDFW consists of three repositories on Github:
- ucl-tools: Unified Clustering Tools (UCL), launch/stop applications for multiple platforms and manage overall lifecycle of applications
- ula-tools: Unified Layout Tools (ULA), application layout for virtual displays on virtual screen (mapped from physical displays).
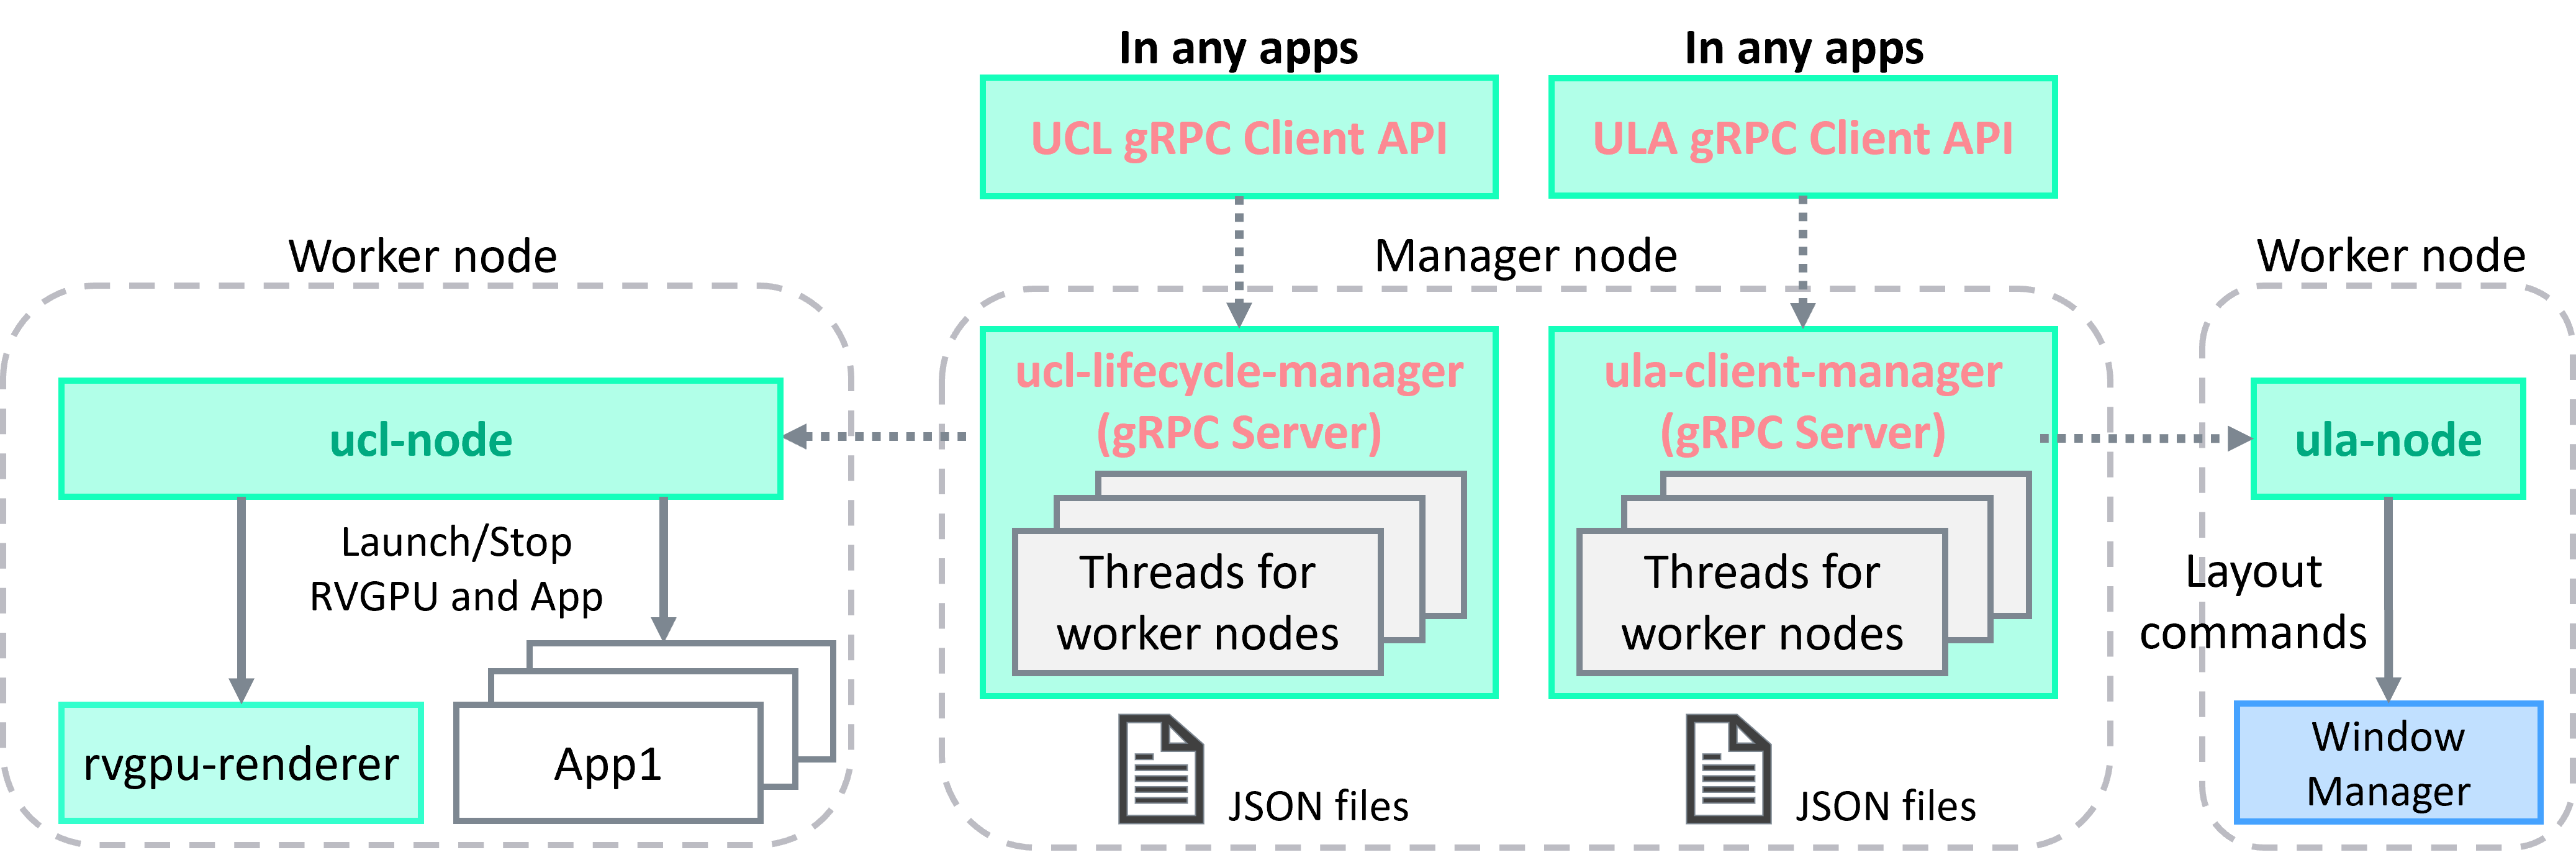
DDFW APIs
The API functionality of both UCL and ULA are both exposed with gRPC. Once the gRPC Servers (ucl-lifecycle-manager for UCL and ula-client-manager for ULA) are running, you can launch gRPC Client API from any application or command line and easily use their functions.
Reference implementations of gRPC Client for each UCL/ULA are released here. If you want to implement UCL/ULA APIs in your existing apps, please refer to them.
Json settings
To run Unified HMI frameworks, you need to prepare three Json files correctly for your execution environment.
-
virtual-screen-def.json: Execution environment such as display and node (SoCs/VMs/PCs) informations. Please put this file on all related host.
-
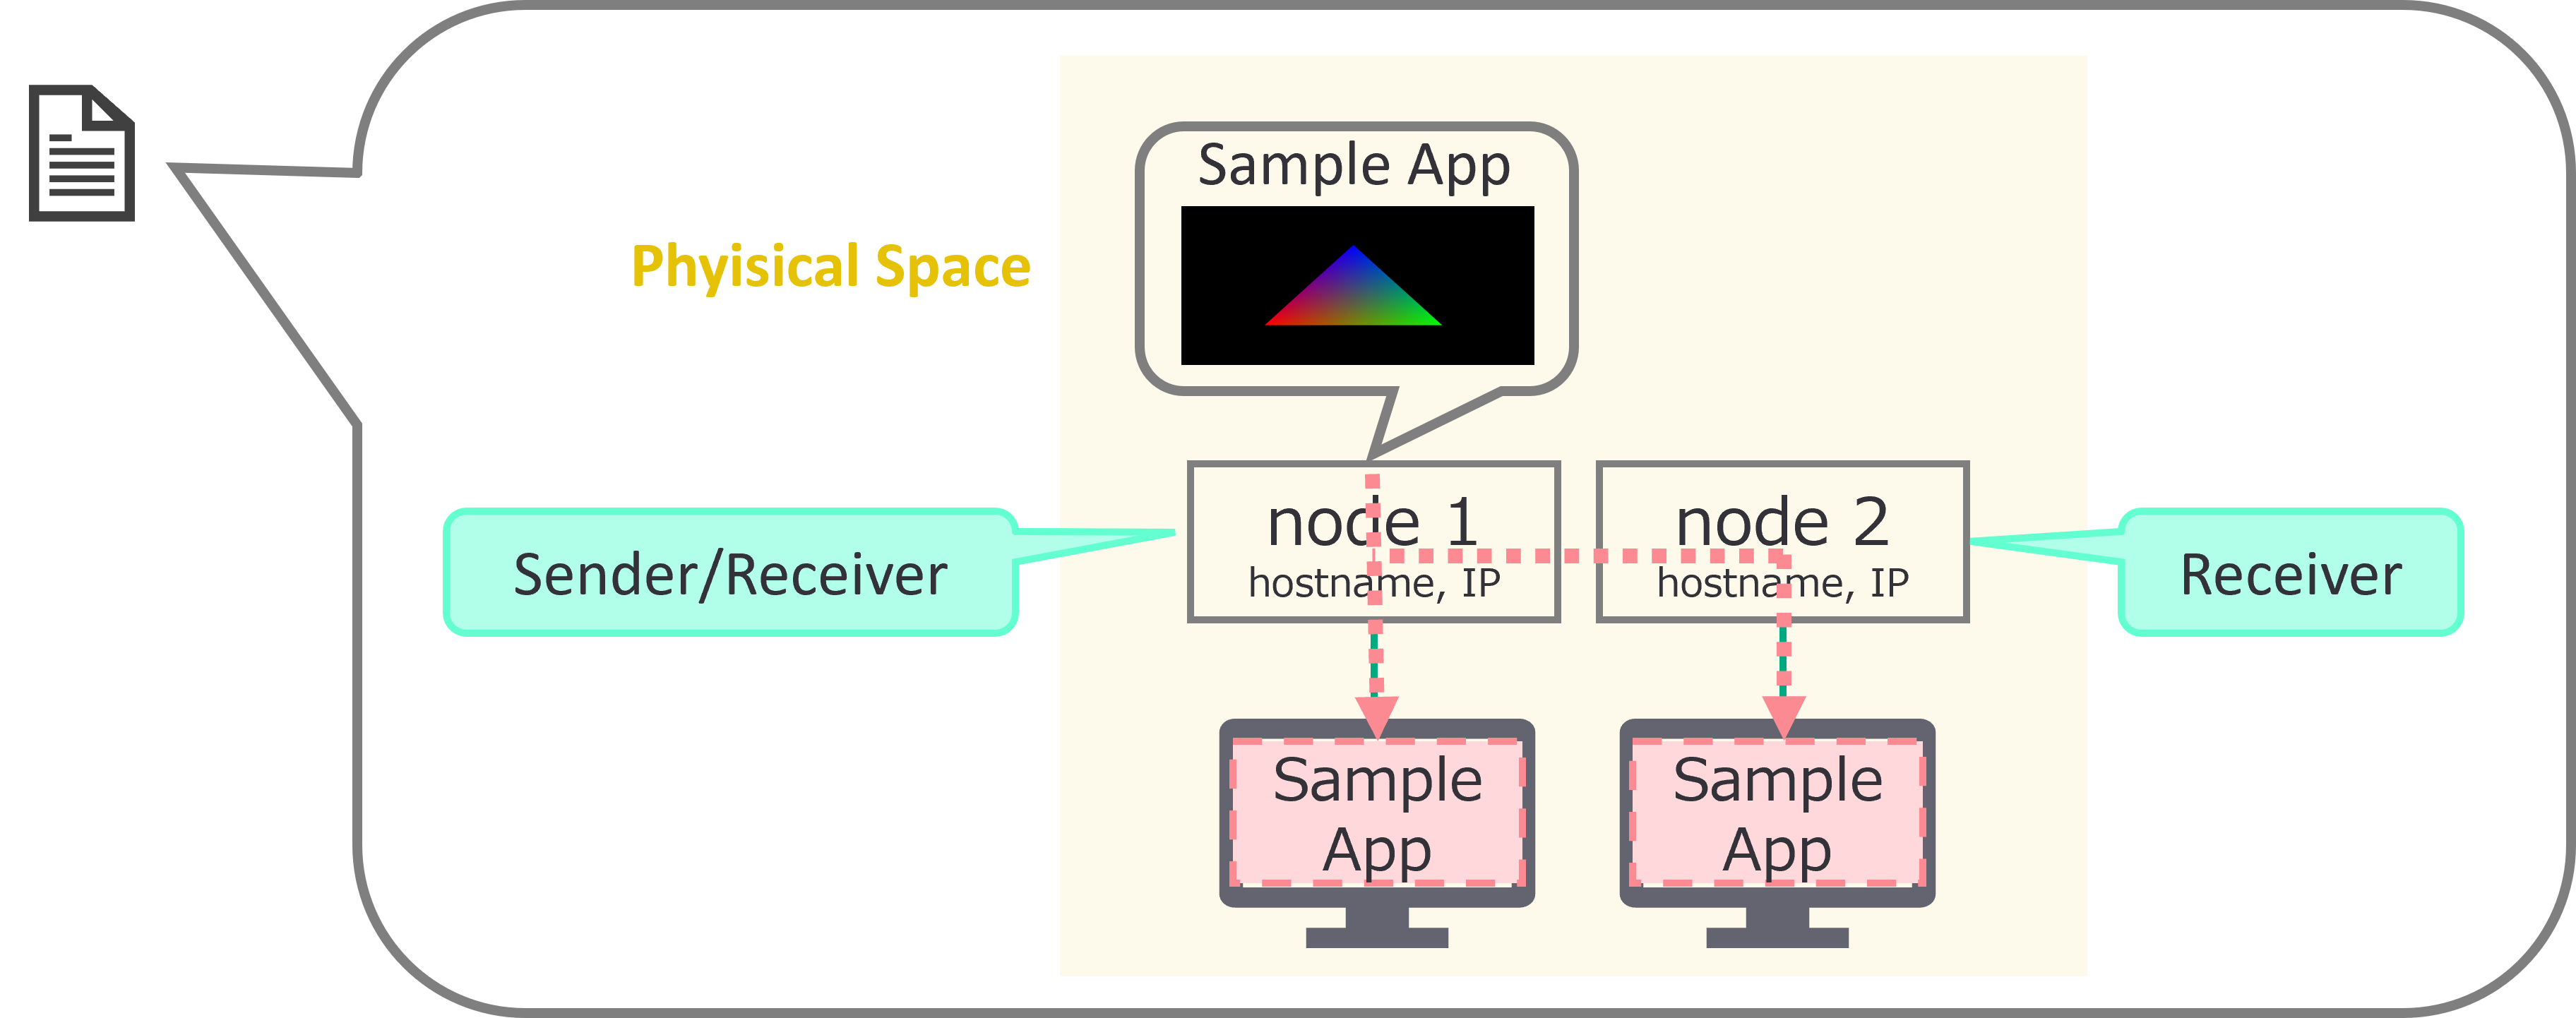
app.json: Application execution information which can also take a sender/receiver relationship. Please put this file on one of the sender/receiver or a host that can be communicate with them via network.
-
initial-vscreen.json: application layout information such as position and size. Please put this file on one of the sender/receiver or a host that can be communicate with them via network.
Json files need to be created correctly for your execution environment.
Placement Guidelines:
- virtual-screen-def.json: Place on every node participating in the distributed display system.
- app.json and initial-vscreen.json: Place on the sender node or a node that can communicate with all participants.
How to install Unified HMI frameworks in your Build
Follow the AGL documentation for the build process, and set up the "Initializing Your Build Environment" section as described below to enable the AGL feature 'agl-uhmi'.
For example:
$ cd $AGL_TOP/master
$ source ./meta-agl/scripts/aglsetup.sh -m qemux86-64 -b qemux86-64 agl-demo agl-devel agl-uhmi
After adding the feature, execute the command:
$ bitbake <image_name>
To add RVGPU and DDFW to the build images, please add the packagegroup that enable RVGPU(packagegroup-rvgpu) and DDFW(packagegroup-ddfw) to the installation target using the following command.
$ echo 'IMAGE_INSTALL:append = " packagegroup-rvgpu packagegroup-ddfw"' >> conf/local.conf
After adding the feature, you can build AGL image by executing following command:
$ bitbake <image_name>
<image_name> with the appropriate values you want. We have confirmed the operation with the agl-ivi-demo-flutter.
How to setup and boot
For Environment setup instructions for each platform, refer to the following links in the AGL Documentation: * Building for x86(Emulation and Hardware) * Building for Raspberry Pi 4 * Building for Supported Renesas Boards
Preconfigured Images for using Unified HMI
Preconfigured images for testing Unified HMI on the AGL have been released here By using them, you can easily perform tests in just a few steps.
How to use Unified HMI
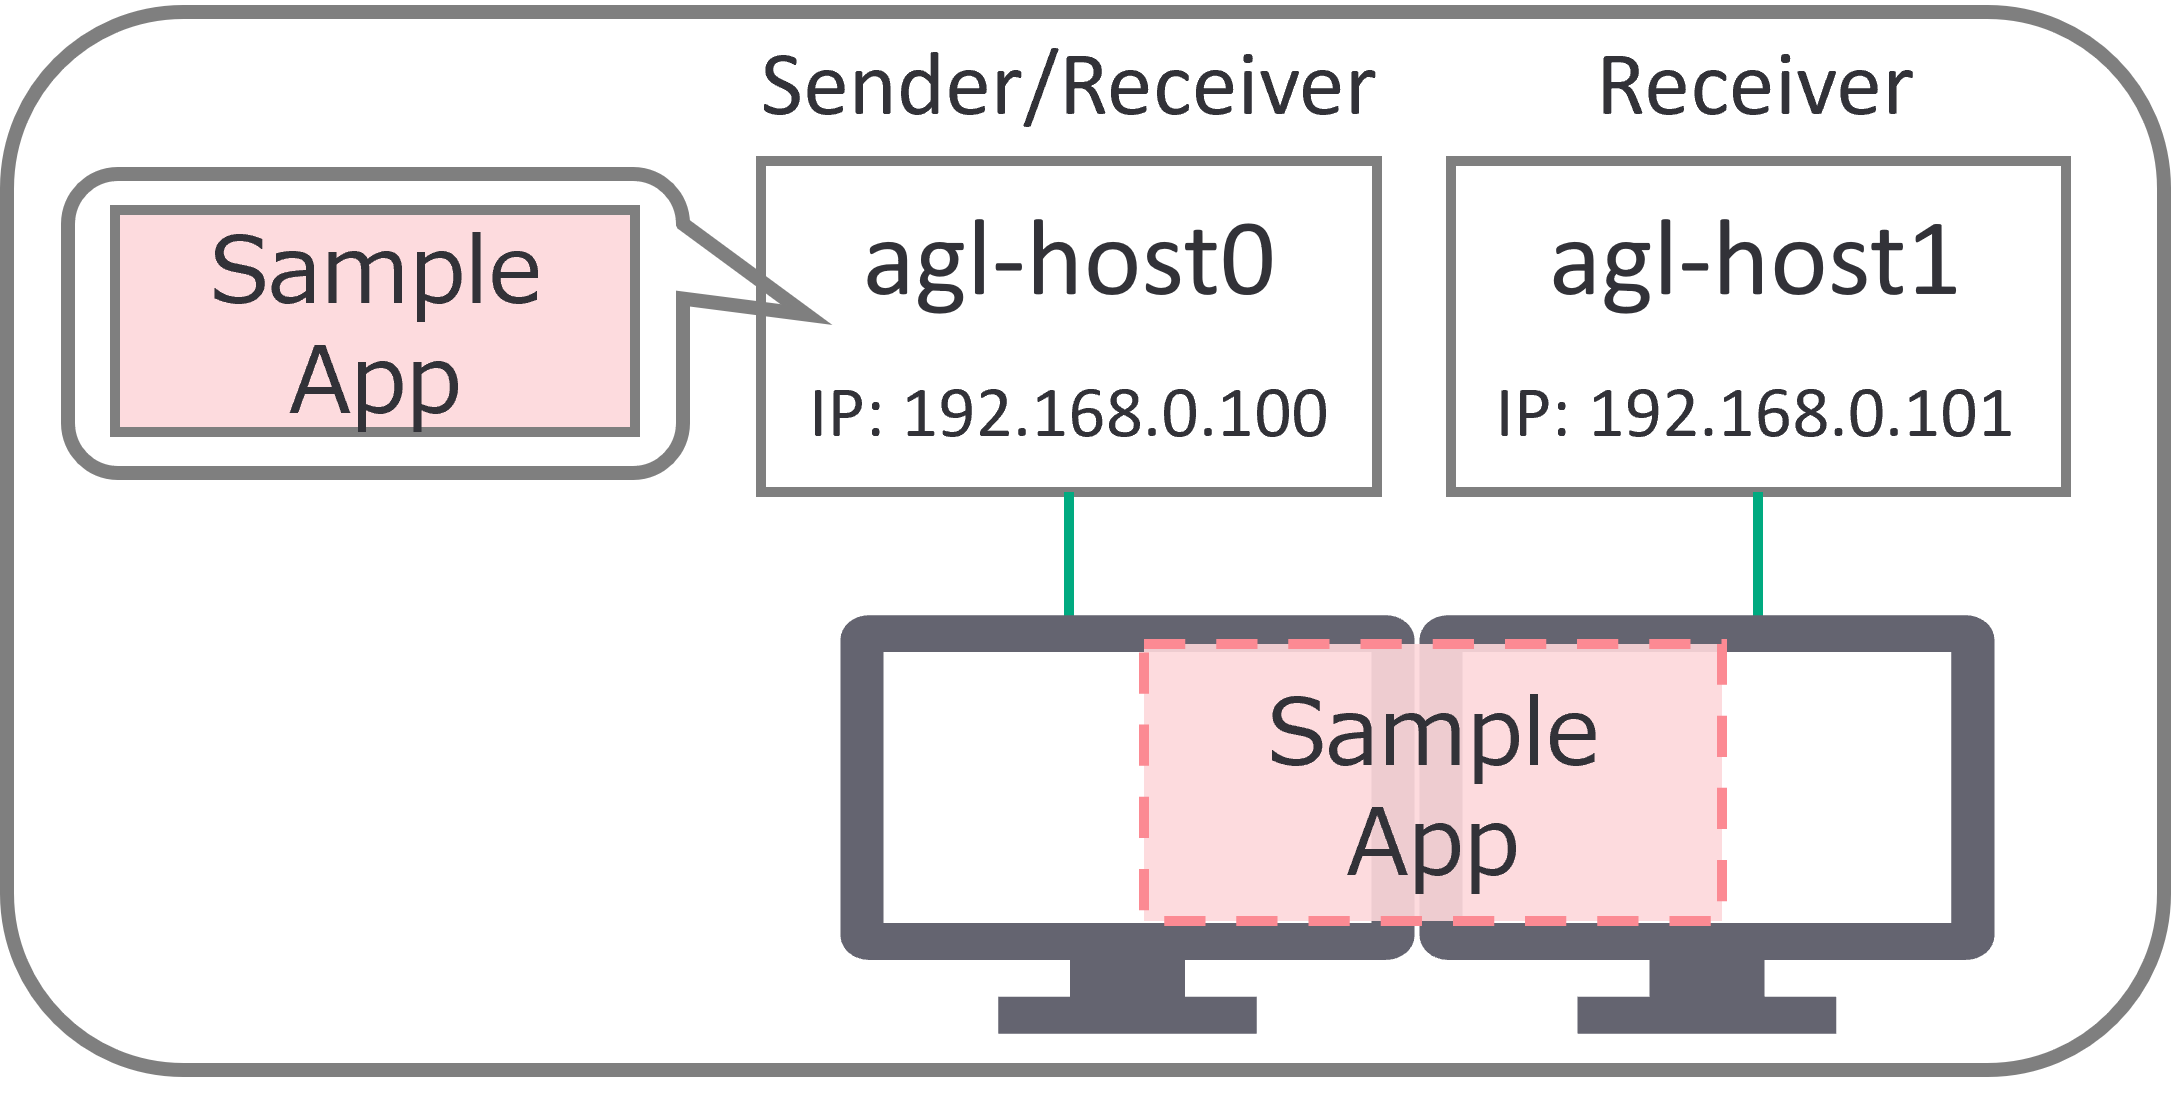
In the following verification procedure, it is assumed that two SoCs or Virtual Machines, are each connected to a Full HD display, arranged side by side as shown in the following diagram.
Here, agl-host0 will act as the sender, and the application will be executed on agl-host0. Both agl-host0 (itself) and agl-host1 will render it remotely as receivers, enabling the display of the application across two displays.
Set Hostnames and IP addresses.
Please set unique hostnames and IP addresses to ensure correct communication between nodes over the network.
Set environment variables
For using Unified HMI, please set XDG_RUNTIME_DIR=/run/user/<your_UID> and WAYLAND_DISPLAY=<your_WAYLAND_DISPLAY> correctly in /lib/systemd/system/ucl-node.service.
Please execute $ls /run/user/ in your environment to check <your_UID>.
e.g. In agl-ivi-demo-flutter, XDG_RUNTIME_DIR=/run/user/1001
WAYLAND_DISPLAY=wayland-0
Note: When using agl demo images like agl-ivi-demo-flutter, this setup is not required.
Customizing Virtual Screen Definitions (both agl-host0/agl-host1)
Adjust the /etc/uhmi-framework/virtual-screen-def.json file to match your environment. In this demo, please modify Json file as shown in below:
{
    "virtual_screen_2d": {
        "size": {"virtual_w": 3840, "virtual_h": 1080},
        "virtual_displays": [
            {"vdisplay_id": 0, "disp_name": "AGL_SCREEN0", "virtual_x": 0, "virtual_y": 0, "virtual_w": 1920, "virtual_h": 1080},
            {"vdisplay_id": 1, "disp_name": "AGL_SCREEN1", "virtual_x": 1920, "virtual_y": 0, "virtual_w": 1920, "virtual_h": 1080}
        ]
    },
    "virtual_screen_3d": {},
    "real_displays": [
        {"node_id": 0, "vdisplay_id": 0, "pixel_w": 1920, "pixel_h": 1080, "rdisplay_id": 0},
        {"node_id": 1, "vdisplay_id": 1, "pixel_w": 1920, "pixel_h": 1080, "rdisplay_id": 0}
    ],
    "node": [
        {"node_id": 0, "hostname": "agl-host0", "ip": "192.168.0.100"},
        {"node_id": 1, "hostname": "agl-host1", "ip": "192.168.0.101"}
    ],
    "distributed_window_system": {
        "ucl_lifecycle_manager" : {"node_id" : 0, "port": 6543},
        "ula_client_manager" : {"node_id" : 0, "port": 6443},
        "framework_node": [
            {"node_id": 0,"ula": {"debug": false, "debug_port": 8080, "port": 10100},"ucl_node": {"port": 7654},
             "compositor": [{"vdisplay_ids": [0], "sock_domain_name": "rvgpu-compositor-0", "listen_port": 36000}]
            },
            {"node_id": 1,"ula": {"debug": false, "debug_port": 8080, "port": 10100},"ucl_node": {"port": 7654},
             "compositor": [{"vdisplay_ids": [1], "sock_domain_name": "rvgpu-compositor-1", "listen_port": 36001}]
            }
        ]
    }
}
Please put the same virtual-screen-def.json on both agl-host0/agl-host1.
Be sure to set the hostname and IP fields in the node key to accurately reflect your specific network configuration.
Restarting Services
After updating configuration files, restart the relevant services on each node using the following commands. A full system reboot is not required unless otherwise specified:
$ systemctl restart ula-node
$ systemctl restart ucl-node
Also, please restart the following system services only in one node indicated as ucl_lifecycle_manager or ula_client_manager in virtual-screen-def.json.
$ systemctl restart ucl_lifecycle_manager
$ systemctl restart ula_client_manager
After restarting these services, your system should be ready to use DDFW commands with the new configuration.
Remote rendering of apps with RVGPU using UCL
UCL provides a distributed launch feature for applications using RVGPU. By preparing an app.json configuration, you can enable the launch of applications across multiple devices in a distributed environment.
Setting Up for Application Launch using UCL (agl-host0)
To facilitate the distributed launch of an application with UCL, you need to create an app.json file on agl-host0 that specifies the details of the application and how it should be executed on the sender and receiver nodes.
Example of app.json:
{
  "format_v1": {
    "command_type": "remote_virtio_gpu",
    "appli_name": "glmark2-es2-wayland",
    "sender": {
      "launcher": "agl-host0",
      "command": "ucl-virtio-gpu-wl-send",
      "frontend_params": {
        "scanout_x": 0,
        "scanout_y": 0,
        "scanout_w": 1920,
        "scanout_h": 1080
      },
      "appli": "/usr/bin/glmark2-es2-wayland -s 1920x1080 -b desktop:blur-radius=5:effect=blur:passes=1:separable=true:windows=4 --run-forever",
      "env": "LD_LIBRARY_PATH=/usr/lib/mesa-virtio"
    },
    "receivers": [
      {
        "launcher": "agl-host0",
        "backend_params": {
          "listen_port": 36000
        }
      },
      {
        "launcher": "agl-host1",
        "backend_params": {
          "listen_port": 36001
        }
      }
    ]
  }
}
In this example, the application glmark2-es2-wayland is configured to launch on the sender node agl-host0 and display its output on the receiver nodes agl-host0 and agl-host1. The scanout_x, scanout_y, scanout_w, scanout_h parameters define the size of the window.
Please set listen_port correctly to match with one defined as framework_node keys in virtual-screen-def.json, ensuring the communication between sender and receivers.
Launching the Application by UCL (agl-host0)
Once the app.json file is ready, you can execute the application across the distributed system by piping the JSON content to the ucl-api-comm command, which is the reference implementation for UCL APIs.
Before launching applications, please start rvgpu-renderer on all receivers:
$ ucl-api-comm -c launch_compositor_async
Then, launch apps as below:
$ ucl-api-comm -c run_command <path to app.json>
Please ensure that the app.json file you create is correctly formatted and contains the appropriate parameters for your specific use case.
Layout the application by ULA
ULA allows you to define physical displays on a virtual screen and provides the ability to apply layout settings such as position and size to applications.
Creating a Layout Configuration File (agl-host0)
To define the layout for your applications, you need to create a initial_vscreen.json file, with the necessary configuration details on agl-host0. This file will contain the layout settings that specify how applications should be positioned and sized within the virtual screen. Here is an example of what the contents of initial_vscreen.json file might look like:
{
  "command": "initial_vscreen",
  "vlayer": [
    {
      "appli_name": "glmark2-es2-wayland",
      "VID": 910000,
      "coord": "global",
      "virtual_w": 1920,
      "virtual_h": 1080,
      "vsrc_x": 0,
      "vsrc_y": 0,
      "vsrc_w": 1920,
      "vsrc_h": 1080,
      "vdst_x": 960,
      "vdst_y": 0,
      "vdst_w": 1920,
      "vdst_h": 1080,
      "z_order": 1,
      "vsurface": [
        {
          "VID": 5100,
          "pixel_w": 1920,
          "pixel_h": 1080,
          "psrc_x": 0,
          "psrc_y": 0,
          "psrc_w": 1920,
          "psrc_h": 1080,
          "vdst_x": 0,
          "vdst_y": 0,
          "vdst_w": 1920,
          "vdst_h": 1080
        }
      ]
    }
  ]
}
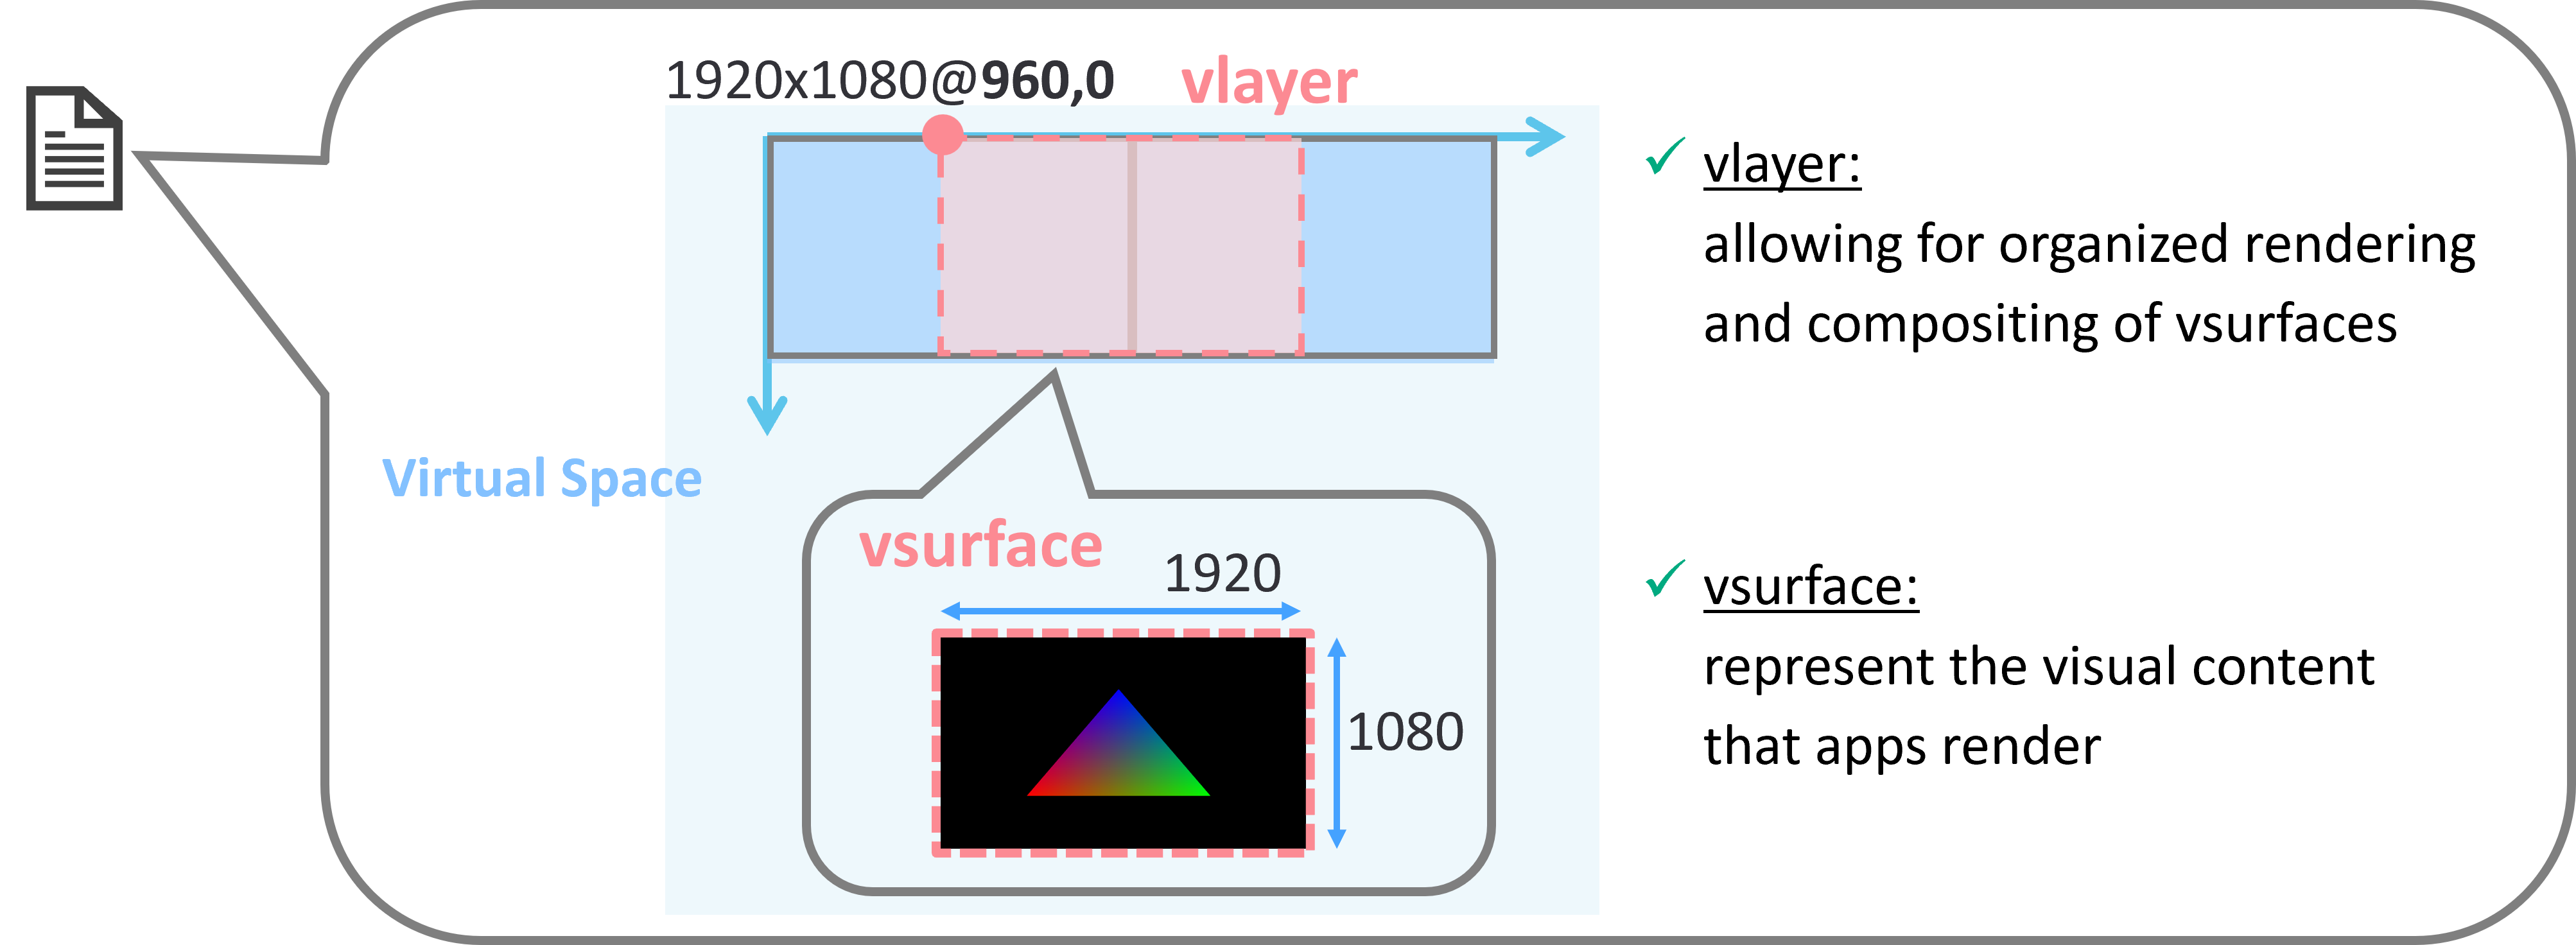
In this example, the application is rendered across the right half of the agl-host0 and the left half of agl-host1 display.
-
vlayer defines a virtual layer that represents a group of surfaces within the virtual screen. Each layer has a unique Virtual ID (VID) and can contain multiple surfaces. The layer's source (
vsrc_x,vsrc_y,vsrc_w,vsrc_h) and destination (vdst_x,vdst_y,vdst_w,vdst_h) coordinates determine where and how large the layer appears on the virtual screen. -
vsurface defines individual surfaces within the virtual layer. Each surface also has a VID, and its pixel dimensions (
pixel_w,pixel_h) represent the actual size of the content. The source (psrc_x,psrc_y,psrc_w,psrc_h) and destination (vdst_x,vdst_y,vdst_w,vdst_h) coordinates determine the portion of the content to display and its location within the layer.
Applying the Layout Configuration (agl-host0)
Once you have created the initial_vscreen.json file with your layout configuration, you can apply it to your system using the following command:
$ ula-grpc-client -c DwmSetLayoutCommand <path to initial-vscreen.json>
Executing this command will process the configuration from the JSON file and apply the layout settings to the virtual screen. As a result, the applications will appear in the specified positions and sizes according to the layout defined in the JSON file.
Ensure that the initial_vscreen.json file you create accurately reflects the desired layout for your applications and display setup.